How to Install Ios in Cisco Router in Rommon Mode
This tutorial explains how to back up the Cisco IOS from the running router and how to restore the Cisco IOS image file from the TFTP server using the ROMMON mode of the router.
Cisco IOS software, just like other operating systems, provides a platform to use routers and other Cisco devices. In other words, Cisco IOS is the operating system of Cisco routers. Cisco offers IOS software as a single image file. Routers use flash memory to store the IOS image file.
When a Cisco router is powered up, it copies the IOS image file from the flash memory to the RAM. After copying, if the IOS image file is compressed, the router extracts it. In the running state, the router uses the IOS software from the RAM. When the router is powered off, all contents of the RAM (including the running IOS software) are deleted. The same process is repeated each time when the router is used.
If a router, upon power-on, does not find a valid IOS image file, it starts in an emergency mode. This mode is known as the ROMMON mode. The ROMMON mode allows us to install a new IOS image file from the file server.
In the following section, we will understand how we can install or restore an IOS image file from a file server in ROMMON mode.
Real router or simulator software
For practice, you can use a physical router or can use a simulator software. No matter what you use, the process and commands are the same. Since the same process and commands are used, instead of using an actual router, you should always use a simulator software such as the Packet Tracer.
The reason why I prefer simulator software over an actual router is that a little mistake in this process can cause serious problems. Your router may even stop working. But if you are using a simulator software, you can easily reset the lab or can build the lab again without spending a lot of time in troubleshooting or spending a decent amount of money in fixing the issue if using an actual router.
To download the latest version of the packet tracer and learn how to install and use it, visit the following page.
Download the packet tracer
Setting up a packet tracer LAB for the practice
Open the Packet Tracer and click the 'End Devices' icon. Drag a Server and a PC-PT from the end devices and drop them in the workspace.
The following image shows these steps.

Click the 'Routers' icon. Drag an '1841 series' router from the available routers and drop it in the workspace.
The following image shows these steps.

Click the 'Connections' icon. Connect the FastEthernet0/0 interface of the Router to the FastEthernet0 interface of the Server and the console port of the Router to the RS232 port of the PC-PT via a cross cable and a console cable, respectively.
The following image shows these steps.

Access the CLI prompt of the Router and assign an IP address to the FastEthernet0/0.
The following image shows this process step-by-step.

Assign an IP address from the same subnet to the FastEthernet0 interface of the Server.
The following image shows this process step-by-step.

Click the PC-PT and click the Desktop menu and click the Terminal icon and click the OK button to accept the default settings.

That's all the setup we need. Either create this LAB in your packet tracer or download this pre-created LAB and load it on the Packet Tracer.
Pre-built Packet Tracer LAB for the practice
Pre-built Packet Tracer LAB for the practice
How do routers manage IOS image files?
Routers use the flash memory to store IOS image files. From the flash memory, during the boot process, the router loads the IOS image file into the RAM. If more than one IOS image files are available, the router loads the first accessible IOS image file. If no IOS image file is available, the router enters the ROMMON mode. The ROMMON mode allows us to download a new IOS image file or to restore an IOS image file from backup in an emergency.
TFTP Protocol
TFTP is the most lightweight authentication-less protocol. It is used to transfer files between two supporting LAN devices. It arrives in two variations: TFTP server and TFTP client. TFTP server is installed on the device that contains the file and the TFTP client is installed on the device that receives the file.
TFTP protocol supports only read and write operations. TFTP client can only read files from the root directory of the TFTP server. TFTP client can only write files on the root directory of the TFTP server. TFTP client cannot list, delete, and rename files or directories available on the TFTP server.
Cisco IOS includes the TFTP client. This means you can connect a Cisco router to a TFTP server and transfer any file from the TFTP server to the router. You can install the TFTP server on any standard PC and operating system.
In our LAB, the TFTP server is already installed on the Server system that we connected to the router. If you are using an actual router for the practice, download any open source TFTP server program and install it on the system that is connected to the router on the Ethernet port.
Taking backup of the current (or existing) IOS image file
Access the privileged-exec mode of the router and run the 'show version' command. From the output, note down the name of the IOS file.
Run the 'show flash' command and note down the name of all available IOS image files.
The following image shows the output of both commands.

To check and verify the connectivity between the router and the TFTP server, use the following command.
The following image shows the output of this command.

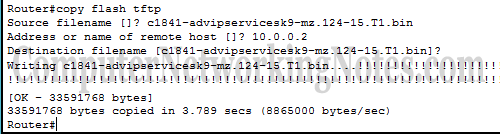
To take the backup of the current or existing IOS image file, use the following command from the privileged-exec mode.
This command needs three arguments.
Source filename: - Specify the name of the IOS image file that you want to back up from the Flash memory to the TFTP server.
Address or name of remote host: - Type the IP address of the TFTP Server.
Destination filename: - If you want to store the IOS image file with a different name at the TFTP server, specify that name. To use the same name, press the Enter key.
TFTP protocol copies the specified IOS image file on the root directory of the TFTP server. It also prints the real-time progress of the copy operation.
The following image shows the output of the above command with arguments.
To verify that the IOS image file has been successfully backed up, click the Server and click the config tab and expand the Services tab from the left menu. In the file section of the right pane, you can see the copied IOS image file.
The following image shows the above steps with the sample output.

Simulating an emergency
If you are following this exercise on an actual router, either skip this step or follow this step under the supervision of an instructor.
Suppose that the IOS image file stored in the flash memory is accidentally or intentionally deleted. If a functional IOS image file is not available, the router does not start. To simulate this situation, you can delete the IOS image file from the flash memory.
To delete the IOS image file from the flash memory, use the following command from the privileged-exec mode.
Router#delete:[IOS File Name]
To confirm the delete operation, press the 'Enter' key when it prompts.
To verify that the file has been successfully deleted, you can use the 'show flash' command again.
The following image shows the output of this command.

As mentioned above, when we power-up a router, the router copies the IOS image file from the flash memory into the RAM and uses the IOS image file from the RAM as long as it stays on. Because of this, the router will keep functioning till the next boot.
But, at the next boot time when the router fails to find a valid IOS image file in the flash memory, the router will not start. By default, if a router does not find a valid IOS image file on startup, it starts a special emergency mode. This mode is known as the ROMMON mode. The ROMMON mode allows us to install a new IOS image or restore the IOS image file from a file server.
To restart the router, run the 'reload' command from the privileged-exec mode.
The following image shows how the router starts the ROMMON mode if it does not find a valid IOS image file.

Restoring the IOS image file in the ROMMON mode
To download a new IOS image file from the TFTP server, the 'tftdnld' command is used. Before we use this command, we must have to set a few essential variables. These variables are the following.
- IP_ADDRESS:- Temporary IP address of the router.
- IP_SUBNET_MASK:- Subnet mask of the assigned IP address.
- DEFAULT_GATEWAY:- IP address of the TFTP Server.
- TFTP_SERVER:- IP address of the TFTP Server.
- TFTP_FILE:- Exact name of the IOS image file. The name is case sensitive.
- TFTP_CHECKSUM:- Prevent checksum errors.
There is no need to memorize these variables. To view these variables along with a short description explaining how to use this command, type a question mark after this command and press the Enter key.
The following image shows the output of the above command.

Set the required variables and run the 'tftpdnld' command. This command lists all variables and their values. If a variable is incorrect, type 'N' and correct that variable and execute this command again. If all the variables are true, type 'Y' to confirm the download operation.
The following image shows the sample output of this command.

If all variables are correct, this command downloads the IOS image file from the TFTP server to the flash memory. Once the downloading is done, use the 'reset' command to restart the router.

After the restart, if the router starts normally using the new IOS image file, it verifies that we have successfully restored the IOS image file.
Quick troubleshooting tips
Instead of starting normally, if the router starts in the ROMMON mode again, check the following.
- The TFTP server is running.
- The IOS file is located in the root directory of the TFTP server.
- The IOS file being downloaded is compatible with the hardware.
- Use the first built-in router's interface to connect to the TFTP server. This command does not work with modular interfaces.
- The server and device are connected via a supporting cable. Use a cross cable, if both are connected directly. If both are connected via a switch, use a straight-through cable.
- All variable commands are case sensitive and must be entered in the upper case.
- The entered IOS file name must exactly match the file name stored in the TFTP server.
- IP_ADDRESS is a temporary address of a router. It must be different from DEFAULT_GATEWAY. You can choose any unused IP address for the router from the subnet of DEFAULT_GATEWAY.
- DEFAULT_GATEWAY and TFTP_SERVER are the same for this process. Use the IP address of the TFTP server for both.
That's all for this tutorial. If you like this tutorial, please don't forget to share it with friends through your favorite social network.
How to Install Ios in Cisco Router in Rommon Mode
Source: https://www.computernetworkingnotes.com/ccna-study-guide/cisco-ios-backup-and-restore-process-step-by-step-guide.html